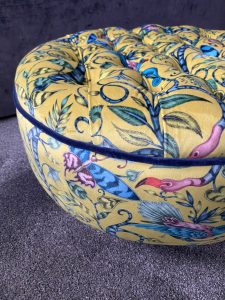
A step by step guide to making a circular footstool. The footstool I have made is deep buttoned in contrast velvet buttons. With a velvet cover in an all over design. Follow along and send us over your creations on instagram at west_interior_design

What you'll need

18mm ply wood for top of footstool
Drawing a circle on wood
Mark out holes for buttons

I started first at the diameter of my footstool. I have chosen 20” diameter with a 6” deep base with 3” feet

To mark the circle accurately I used a piece of wood screwed to the board and a pen hole to mark the full circle

I marked out the holes for the buttons by creating a grid and then marking out the diagonals. I decided on 4”wide x 6” for the sections as I liked the look. Even buttoning is an option also, you have to decide on the look you prefer

Jigsaw circular cutting
Upstands I used
Upstands cut

Use a jigsaw to cut the circle. If you can use a circular template, like I used for the pen, this will make cutting the circles accurate

Now cut the upstands. I’m using old casino table legs for the feet and the upstands. I like to use what I’ve got hanging around so I can recycle what I do not want anymore. The upstands were all 6″ high and I cut them down at 3″ each. 

Test upstands
Drill the top and drill the foam and line them up

Lay out a dry run of the top and bottom with the upstands in around the edge pointing towards the middle. The upstands went in on the quarter marks and then in the middle of the quater marks, like a clock face

When the upstands were laid out and I was happy with the positions, I marked with my sharpie, through the middle of the top, bottom and stands and numbered them so they could be matched up again

The top was then fixed to the upstands and holes for the buttons were drilled ready for the foam

2″ Foam was then placed on the top and cut to the circle. Flip the footstool and mark the foam through the drilled holes. Then the foam holes can be drilled

Spray glue the foam to the top of the footstool with holes lined up. Glue the polyester on top and make holes for the buttons. Now its time for buttioning

Test Deep Buttoning
Button with fabric

Next mark out the fabric with additional length and width for the pleats. If you have enough. Test the buttoning first. This will give a good indication of the spaces on the fabric between the buttons. As a general rule for 4″ x 6″ buttoning, I added 1.25″ to each section of the 4″ and 1.5″ to the 6″ section. To be certain, its always best to test a piece first on all pieces

When I was happy with the spacing and the look it created, I buttoned with the fabric I had choosen. The fabric is then folded in to be stapled down after the sides have been screwed on.

Kerfed 6mm ply
Picture14
Base screwed on
Sides going on
Screw in at top and bottom

Next step, it’s time to cut the sides and put the base in. I’ve used 6mm ply and cut kerf lines in it to bend it. The lines were cut 13mm apart, approx. 

Once these are cut, the base can go on, lining up the middle marks made earlier. Screw in the base and then place the sides on. Screw the sides at the top and bottom of the base. Join the sides on an upstand so both sides can be screwed in evenly. 

Mark a line 1/2″ down from the top of the base, this is for the wrap around 1/2″ foam to be glued to

Foam side
Staple in polyester
Staple in fabric

I have cut the blue foam to 2 1/2” wide. Glue this to the marked line. This is where the piping will sit, just underneath the foam

Cover the foam with the top polyester layer to the edge of where the piping will sit and staple. Trim off the excess polyester close to the staples. Pull over the top fabric and pleat where needed and staple down to just under the polyeter line.

The line of staples can now be used to cut the piping to size and joined in a complete circle which matches the circumference of the stool

Piping
Attached fabric
Make sure its all at the same level

Cover the piping cord with your chosen fabric to the size of the circumference of the stool. Once you are happy with the size and it fits, staple in on to the line just above the fabric staple line. Check the measurement often to get thisto the same depth all the way around

Join the fabric in the same way as the piping, to the size of the circumference of the stool. Using the same method, check that the size is correct. feed the fabric on over the top, inside out and staple to just above the line of the piping

Staple all around the fabric
Foam and polyester around the edge
Staple fabric underneath

after the top fabric is stapled all of the way around, 1/2″ foam and polyester around the side of the footstool. 

Underneath the fabric staple line, run some tacking strip on the underside of the piping and fabric. This secures this into place. To avoid creating a ridge, run the foam and polyester to the tacking strip and fix securely, keep this area as smooth as possble and make sure it all stays where it was put. Take the time here. 

Pull down the fabric and staple to the underside of the footstool

Complete fabric cover stool
Feet placement
Feet on

Flip over the stool so you can see the base. Decide where you would like the feet to go. I decided to place them 3″ in from the edge. Drill the holes and make sure the spiked wingnuts fit. I was also aware to avoid the upstands, this could be in the way to screw in the feet

After I checked the wing nuts fit, I could then staple on the base. I chose a plain cotton to contrast the fabric. Available in our shop here

I staple that on around the edge of the underside

Marked out the holes, whic i could find by feeling over the service. I cut away a small hole and hammered in the wing nuts flush. Then I screwed in the feet. Although I had cut the feet from old casino table legs, I hadnt found the screws in time to deliver this to the customer. The custom feet can be used on the next one 

Love it? But do not want to make it?
Buy it here!

Rated 0 out of 5

Footstools

20" Round Footstool, Deep Buttoned Soft Velvet

Beautiful round footstool made with vibrant soft velvet 20″ round with deep buttons in navy velvet, piped with navy velvet Feet are round oak coloured wood at 3″ A real...

£595.00

If you have a style that you would like that’s not listed here, we are happy to discuss other options with you. We always like new and exciting which are completely tailored to what you would like.

West Interior Design is based in Kent and we are happy to travel. Our service also includes, Remaking of existing curtains, Roman Blinds, Cushions, Box cushions, Tiebacks and Upholstery. Upholstery can vary from tradional to modern and anything inbetween. 

We offer a curtain fitting service and can provide poles and tracks and accesories if required. 

Join us on social media or email direct